Blazor Unit Testing with IcuBlazor
Blazor allows us to enhance the practice of unit testing. Using IcuBlazor components we can create and execute
- Traditional unit tests using True/False assertions;
- Text and Log tests with a Visual Diff UI;
- UI snapshot tests with pixel-based Image Diffs; and
- End to end (E2E) integration tests with UI Automation
These tests are typically run interactively in the browser. This is especially useful with Hot Reloading. Additionally, tests can run from the command line to support CI/CD workflows.
Unit Testing
Traditional unit tests are easy to write. Here is a test suite defined in a .razor:
@page "/MyTests/TestDocsAsserts"
@inherits IcuBlazor.IcuTestSuite

@code {
    public void TestSimpleChecks() {
        Check().True(2 < 3, "a true test");
        Check().False(2 == 3, "a false test");
        Check().Equal(6*9, 42, "What's the question?");
    }

    async Task TestAsyncMethod() {
        var t0 = DateTime.Now;
        await Task.Delay(500);
        var dt = (DateTime.Now - t0).TotalMilliseconds;
        // Surprise! Sometimes dt<500 :o
        Check().True(dt > 500, $"async test waited {dt} ms");
    }
}
A suite is a subclass of IcuBlazor.IcuTestSuite. By convention, tests are defined in methods that start with "test".
To execute and view the test results you will need an <IcuTestViewer>. Here we define it in a page called /MyTests/Hello.razor.
@page "/MyTests/Hello"

<IcuTestViewer Width="1000">
    <TestDocsAsserts>
</IcuTestViewer>
Now running your app and navigating to https://localhost:.../MyTests/Hello should render something like this:
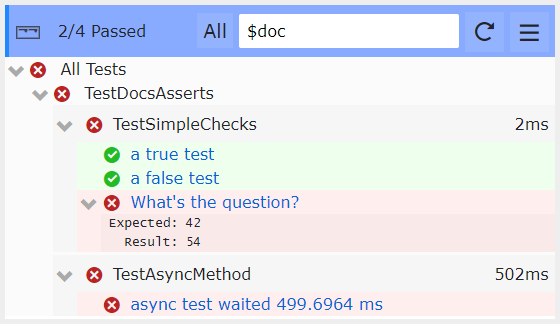
Clicking the blue links will jump to the source line in Visual Studio or VSCode. The Check() calls are used to register the line number to go to when the link is clicked.
Diff Testing
Unlike other testing tools, IcuBlazor goes beyond basic True()/False() assertions.
You can use Check().Text(expect, result, ...) and Check().File(logName, result, ...) to check long strings. If expect differs from result IcuBlazor presents a diff UI. If you click save, the result is saved in a file, {logName}.txt, and is used as the expected value the next time the test is run.

The above result was generated with the code below. Note how the test detected a change in "Summary" but there was no explicit code for that field. Consider what a traditional unit test would look like 😦. How would that test change if Summary changed 😨? Finally, consider how you would refactor the following code 😄.
void Test_text_diff()
{
    var w = new MyWeatherForecast();
    var sb = new StringBuilder();
    sb.AppendLine($"-- Weather init --");
    sb.AppendLine(Conv.AsString(w));

    w.TempC = -10;
    sb.AppendLine($"\n-- Weather @ {w.TempC}°C --");
    sb.AppendLine(Conv.AsString(w));

    w.TempC = 100;
    sb.AppendLine($"\n-- Weather @ {w.TempC}°C --");
    sb.AppendLine(Conv.AsString(w));

    Check().File("weather", sb.ToString(), "changing weather");
}
UI Testing
UI testing and automation is very easy. Here's a test suite that checks our venerable <Counter/> component.
@page "/TestExample"
@inherits IcuBlazor.IcuTestSuite

<IcuTestDiv Suite="@this" Width="300" style="background:yellow;">
    <p>Any Html or Blazor content!</p>
    <Counter @ref="myCounter"/>
</IcuTestDiv>

@code {
    Counter myCounter;

    public async Task Test_Counter_UI()
    {
        await Check().Div("init");

        var button = await UI.Find("button", "Click me");
        await UI.Click(button);
        await UI.Click(button);
        await Check().Div("click_twice");       // Test with UI Automation!
        Check().True(myCounter.currentCount == 2, "Test internal values!");
    }
}
<IcuTestDiv> is basically a <div> that defines a test area where you can place your UI component(s). Here we have styled the div yellow just to discern its bounds. With the UI automation API, we locate the button and click it...twice! Click here for more automation methods.
Check().Div(image_file) is the "Assert" operation of UI testing. It takes a snapshot of the div and compares it pixel-by-pixel with a previous snapshot (named {image_file}.png). An image diff dialog is presented if the images differ.
Because IcuBlazor tests are Blazor components, we can use the @ref attribute to get the component object. With this reference you can directly automate your test. You can set or get state (e.g. myCounter.currentCount) or even invoke methods (e.g. myCounter.ClickButton()).
A run of this test may look like this:
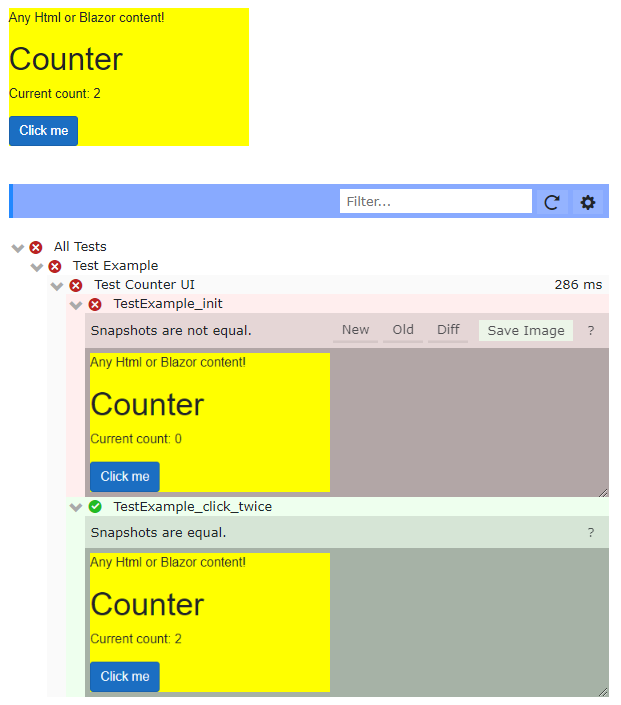
Note how the counter snapshots start at 0 and end with 2, proving that the automation worked!
Additionally, the test component is still at the top of the page--live and clickable. You can continue debugging and interacting with the component even after the tests finish.
Command Line Execution
Many testing frameworks can start execution from the command line which is useful in many automation scenarios like Continuous Integration & Deployment (CI/CD). IcuBlazor can also be invoked from the shell. For example with the dotnet command:
dotnet run --icu "{view-page-command}"
{view-page-command} is any command (or even .bat file) that raises a browser with the blazor test page. For example the command
dotnet run --icu "chrome https://localhost:5001/MyTests/SimpleUIPage"
will start the app server and open a chrome browser with the specified url. The page will execute the tests and output the results to the command line. Here is a sample output:
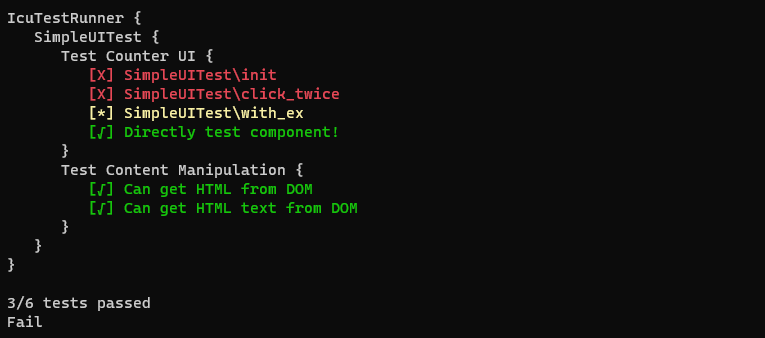
The last line will be either OK or Fail.
Instead of chrome, you can use firefox, msedge or whatever browser you have installed. Each browser comes with useful switches that can improve the test setup. For example, the following command uses --window-size to resize the browser and --app to use a minimal frame.
dotnet run --icu "msedge --app=https://localhost:5001/MyTests/SimpleUIPage --window-size=1300,700"
See Samples/Server.SSBLinked/cmd_line_test.bat.